vim /opt/lampp/etc/extra/httpd-vhosts.conf<VirtualHost *:80>ServerAdmin webmaster@dummy-host.example.comDocumentRoot "/data/web"<Directory "/data/web">Options AllAllowOverride AllRequire all granted</Directory>ServerName www.test.comErrorLog "test-error_log"CustomLog "test-access_log" common</VirtualHost>这里为了方便给vhosts设置一个域名,这个需要修改实体机的/etc/hosts后才能访问:
vim /opt/lampp/etc/php.inizend_extension="/opt/lampp/lib/php/extensions/no-debug-non-zts-20131226/xdebug.so"[xdebug]xdebug.default_enable=1xdebug.remote_enable=1xdebug.remote_handler=dbgpxdebug.remote_host=192.168.174.130xdebug.remote_port=9000xdebug.remote_connect_back=1xdebug.remote_autostart=1最关键的两个设置xdebug.remote_host和xdebug.remote_connect_back,remote_host要设置成服务器的ip,remote_connect_back要设置成1或者on
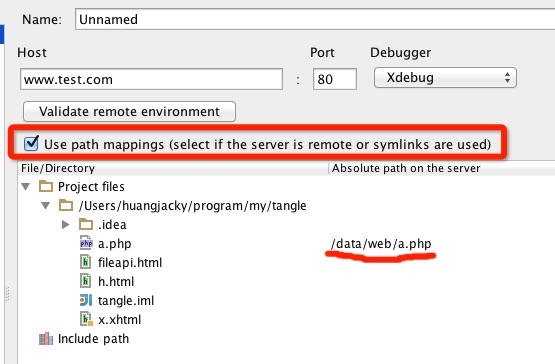
在Host那里要填上,能够正常访问到虚拟机服务器的地址,我们之前设置的虚拟域名是www.test.com,所以我图上也是写得这个。
最关键的设置地方就是要勾上这个路径映射,然后将需要调试的文件写上它在服务器上的路径,比如我这里需要调试a.php,而在虚拟机服务器上我们设置的web目录是/data/web/,那么它映射的路径就应该是/data/web/a.php了。
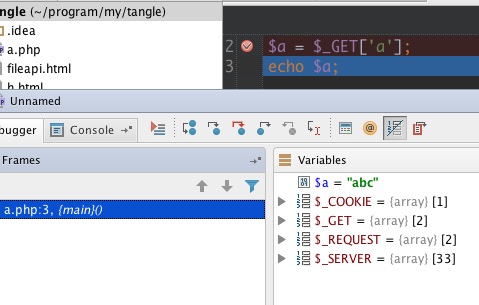
一切设置好了以后,就可以像本地调试那样开始了。
OK了,没有什么技术含量,但希望能帮到需要的朋友,注意把文章中得ip地址,修改你自己的服务器的地址。
以上内容给大家分享了PHP远程调试之XDEBUG的相关知识,希望大家喜欢。