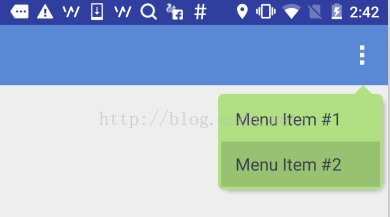
要求顶上的箭头要对准菜单锚点,菜单项按压反色,菜单背景色和按压色可配置。
最简单的做法就是让UX给个三角形的图片往上一贴,但是转念一想这样是不是太low了点,而且不同分辨率也不太好适配,干脆自定义一个ViewGroup吧!
自定义ViewGroup其实很简单,基本都是按一定的套路来的。
一、定义一个attrs.xml
就是声明一下你的这个自定义View有哪些可配置的属性,将来使用的时候可以自由配置。这里声明了7个属性,分别是:箭头宽度、箭头高度、箭头水平偏移、圆角半径、菜单背景色、阴影色、阴影厚度。
<resources><declare-styleable name="ArrowRectangleView"><attr name="arrow_width" format="dimension" /><attr name="arrow_height" format="dimension" /><attr name="arrow_offset" format="dimension" /><attr name="radius" format="dimension" /><attr name="background_color" format="color" /><attr name="shadow_color" format="color" /><attr name="shadow_thickness" format="dimension" /></declare-styleable></resources>二、写一个继承ViewGroup的类,在构造函数中初始化这些属性
public class ArrowRectangleView extends ViewGroup {... ...public ArrowRectangleView(Context context, AttributeSet attrs, int defStyleAttr) {super(context, attrs, defStyleAttr);TypedArray a = context.getTheme().obtainStyledAttributes(attrs,R.styleable.ArrowRectangleView, defStyleAttr, 0);for (int i = 0; i < a.getIndexCount(); i++) {int attr = a.getIndex(i);switch (attr) {case R.styleable.ArrowRectangleView_arrow_width:mArrowWidth = a.getDimensionPixelSize(attr, mArrowWidth);break;case R.styleable.ArrowRectangleView_arrow_height:mArrowHeight = a.getDimensionPixelSize(attr, mArrowHeight);break;case R.styleable.ArrowRectangleView_radius:mRadius = a.getDimensionPixelSize(attr, mRadius);break;case R.styleable.ArrowRectangleView_background_color:mBackgroundColor = a.getColor(attr, mBackgroundColor);break;case R.styleable.ArrowRectangleView_arrow_offset:mArrowOffset = a.getDimensionPixelSize(attr, mArrowOffset);break;case R.styleable.ArrowRectangleView_shadow_color:mShadowColor = a.getColor(attr, mShadowColor);break;case R.styleable.ArrowRectangleView_shadow_thickness:mShadowThickness = a.getDimensionPixelSize(attr, mShadowThickness);break;}}a.recycle();} 三、重写onMeasure()方法@Overrideprotected void onMeasure(int widthMeasureSpec, int heightMeasureSpec) {int count = getChildCount();int maxWidth = 0;// reserve space for the arrow and round cornersint maxHeight = mArrowHeight + mRadius;for (int i = 0; i < count; i++) {final View child = getChildAt(i);final MarginLayoutParams lp = (MarginLayoutParams) child.getLayoutParams();if (child.getVisibility() != GONE) {measureChild(child, widthMeasureSpec, heightMeasureSpec);maxWidth = Math.max(maxWidth, child.getMeasuredWidth() + lp.leftMargin + lp.rightMargin);maxHeight = maxHeight + child.getMeasuredHeight() + lp.topMargin + lp.bottomMargin;}}maxWidth = maxWidth + getPaddingLeft() + getPaddingRight() + mShadowThickness;maxHeight = maxHeight + getPaddingTop() + getPaddingBottom() + mShadowThickness;setMeasuredDimension(maxWidth, maxHeight);} 看起来是不是很简单?当然还有两个小问题: @Overridepublic ViewGroup.LayoutParams generateLayoutParams(AttributeSet attrs) {return new MarginLayoutParams(getContext(), attrs);} 四、重写onLayout()方法 @Overrideprotected void onLayout(boolean changed, int l, int t, int r, int b) {int count = getChildCount();int topOffset = t + mArrowHeight + mRadius/2;int top = 0;int bottom = 0;for (int i = 0; i < count; i++) {final View child = getChildAt(i);top = topOffset + i * child.getMeasuredHeight();bottom = top + child.getMeasuredHeight();child.layout(l, top, r - mRadius/2 - mShadowThickness, bottom);}} 五、重写dispatchDraw()方法 @Overrideprotected void dispatchDraw(Canvas canvas) {// disable h/w acceleration for blur mask filtersetLayerType(View.LAYER_TYPE_SOFTWARE, null);Paint paint = new Paint();paint.setAntiAlias(true);paint.setColor(mBackgroundColor);paint.setStyle(Paint.Style.FILL);// set Xfermode for source and shadow overlappaint.setXfermode(new PorterDuffXfermode(PorterDuff.Mode.DST_OVER));// draw round corner rectanglepaint.setColor(mBackgroundColor);canvas.drawRoundRect(new RectF(0, mArrowHeight, getMeasuredWidth() - mShadowThickness, getMeasuredHeight() - mShadowThickness), mRadius, mRadius, paint);// draw arrowPath path = new Path();int startPoint = getMeasuredWidth() - mArrowOffset;path.moveTo(startPoint, mArrowHeight);path.lineTo(startPoint + mArrowWidth, mArrowHeight);path.lineTo(startPoint + mArrowWidth / 2, 0);path.close();canvas.drawPath(path, paint);// draw shadowif (mShadowThickness > 0) {paint.setMaskFilter(new BlurMaskFilter(mShadowThickness, BlurMaskFilter.Blur.OUTER));paint.setColor(mShadowColor);canvas.drawRoundRect(new RectF(mShadowThickness, mArrowHeight + mShadowThickness, getMeasuredWidth() - mShadowThickness, getMeasuredHeight() - mShadowThickness), mRadius, mRadius, paint);}super.dispatchDraw(canvas);} 六、在layout XML中引用该自定义ViewGroup <?xml version="1.0" encoding="utf-8"?><com.xinxin.arrowrectanglemenu.widget.ArrowRectangleViewxmlns:android="http://schemas.android.com/apk/res/android"xmlns:app="http://schemas.android.com/apk/res-auto"android:layout_width="wrap_content"android:layout_height="wrap_content"android:orientation="vertical"android:background="@android:color/transparent"android:paddingLeft="3dp"android:paddingRight="3dp"android:splitMotionEvents="false"app:arrow_offset="31dp"app:arrow_width="16dp"app:arrow_height="8dp"app:radius="5dp"app:background_color="#ffb1df83"app:shadow_color="#66000000"app:shadow_thickness="5dp"><LinearLayoutandroid:id="@+id/cmx_toolbar_menu_turn_off"android:layout_width="wrap_content"android:layout_height="42dp"><TextViewandroid:layout_width="wrap_content"android:layout_height="wrap_content"android:layout_gravity="center_vertical"android:textSize="16sp"android:textColor="#FF393F4A"android:paddingLeft="16dp"android:paddingRight="32dp"android:clickable="false"android:text="Menu Item #1"/></LinearLayout><LinearLayoutandroid:id="@+id/cmx_toolbar_menu_feedback"android:layout_width="wrap_content"android:layout_height="42dp"><TextViewandroid:layout_width="wrap_content"android:layout_height="wrap_content"android:layout_gravity="center_vertical"android:textSize="16sp"android:textColor="#FF393F4A"android:paddingLeft="16dp"android:paddingRight="32dp"android:clickable="false"android:text="Menu Item #2"/></LinearLayout></com.xinxin.arrowrectanglemenu.widget.ArrowRectangleView>七、在代码里引用该layout XML