//创建下载任务,downloadUrl就是下载链接DownloadManager.Request request = new DownloadManager.Request(Uri.parse(downloadUrl));//指定下载路径和下载文件名request.setDestinationInExternalPublicDir("/download/", fileName);//获取下载管理器DownloadManager downloadManager= (DownloadManager) mContext.getSystemService(Context.DOWNLOAD_SERVICE);//将下载任务加入下载队列,否则不会进行下载downloadManager.enqueue(request);高级用法
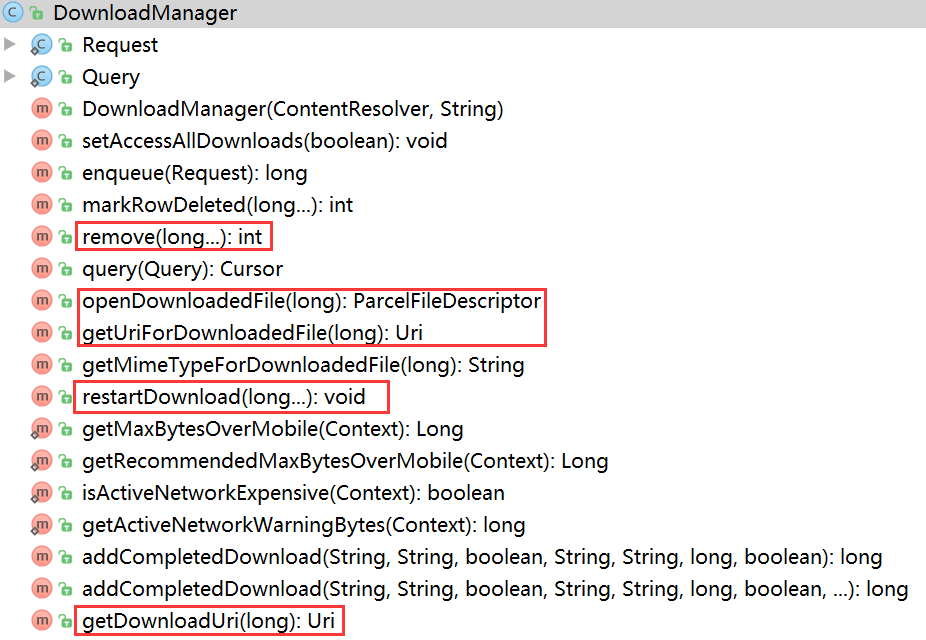
DownloadManager的方法
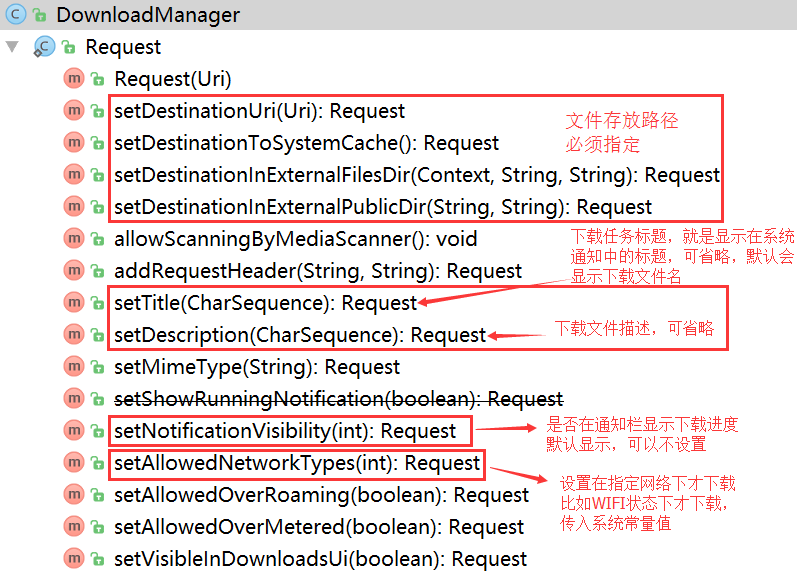
DownloadManager.Request的方法
方法差不多就这些,已经比较全了,可以满足我们绝大部分的使用场景。
实际使用
接下来我们就以APP应用内更新为例,讲一下这些方法的使用
1.首先我们梳理下APP应用内更新的逻辑

APP应用内更新
2.接下来看具体实现,上代码
//使用系统下载器下载private void downloadAPK(String versionUrl, String versionName) {//创建下载任务DownloadManager.Request request = new DownloadManager.Request(Uri.parse(versionUrl));request.setAllowedOverRoaming(false);//漫游网络是否可以下载//设置文件类型,可以在下载结束后自动打开该文件MimeTypeMap mimeTypeMap = MimeTypeMap.getSingleton();String mimeString = mimeTypeMap.getMimeTypeFromExtension(MimeTypeMap.getFileExtensionFromUrl(versionUrl));request.setMimeType(mimeString);//在通知栏中显示,默认就是显示的request.setNotificationVisibility(DownloadManager.Request.VISIBILITY_VISIBLE);request.setVisibleInDownloadsUi(true);//sdcard的目录下的download文件夹,必须设置request.setDestinationInExternalPublicDir("/download/", versionName);//request.setDestinationInExternalFilesDir(),也可以自己制定下载路径//将下载请求加入下载队列downloadManager = (DownloadManager) mContext.getSystemService(Context.DOWNLOAD_SERVICE);//加入下载队列后会给该任务返回一个long型的id,//通过该id可以取消任务,重启任务等等,看上面源码中框起来的方法mTaskId = downloadManager.enqueue(request);//注册广播接收者,监听下载状态mContext.registerReceiver(receiver,new IntentFilter(DownloadManager.ACTION_DOWNLOAD_COMPLETE));} 接下来是广播接收器 //广播接受者,接收下载状态private BroadcastReceiver receiver = new BroadcastReceiver() {@Overridepublic void onReceive(Context context, Intent intent) {checkDownloadStatus();//检查下载状态}}; 检查下载状态 //检查下载状态private void checkDownloadStatus() {DownloadManager.Query query = new DownloadManager.Query();query.setFilterById(mTaskId);//筛选下载任务,传入任务ID,可变参数Cursor c = downloadManager.query(query);if (c.moveToFirst()) {int status = c.getInt(c.getColumnIndex(DownloadManager.COLUMN_STATUS));switch (status) {case DownloadManager.STATUS_PAUSED:MLog.i(">>>下载暂停");case DownloadManager.STATUS_PENDING:MLog.i(">>>下载延迟");case DownloadManager.STATUS_RUNNING:MLog.i(">>>正在下载");break;case DownloadManager.STATUS_SUCCESSFULMLog.i(">>>下载完成");//下载完成安装APK//downloadPath = Environment.getExternalStoragePublicDirectory(Environment.DIRECTORY_DOWNLOADS).getAbsolutePath() + File.separator + versionName;installAPK(new File(downloadPath));break;case DownloadManager.STATUS_FAILED:MLog.i(">>>下载失败");break;}}} 安装APK //下载到本地后执行安装protected void installAPK(File file) {if (!file.exists()) return;Intent intent = new Intent(Intent.ACTION_VIEW);Uri uri = Uri.parse("file://" + file.toString());intent.setDataAndType(uri, "application/vnd.android.package-archive");//在服务中开启activity必须设置flag,后面解释intent.setFlags(Intent.FLAG_ACTIVITY_NEW_TASK);mContext.startActivity(intent);} 到此就完成了应用内更新APP的代码,但是有一些坑需要注意!