本文实例讲述了Android编程实现可滑动的开关效果。分享给大家供大家参考,具体如下:
闲着没事,把之前写的一个Demo放上来分享下。就是一个开关,实现可滑动和动画效果。不是图片切换。
好了,先上图:
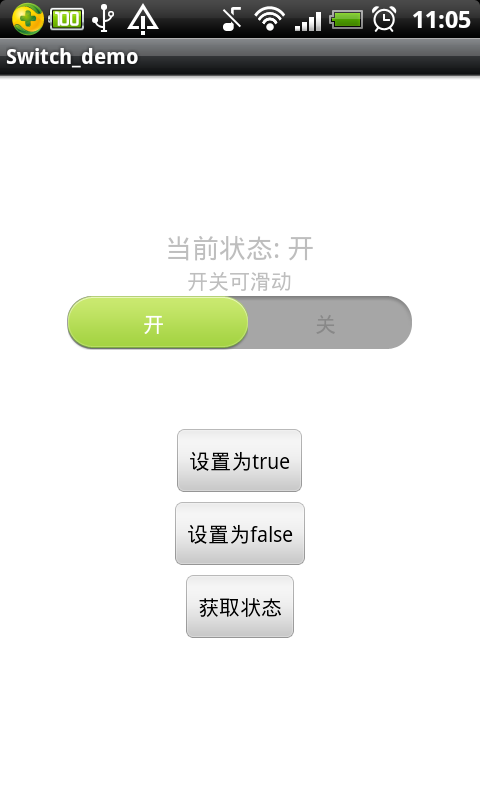
完整实例代码点击此处本站下载。
直接把自定义的这个View代码放上来,有注释应该很好理解:
首先是布局:
<?xml version="1.0" encoding="utf-8"?><RelativeLayout xmlns:android="http://schemas.android.com/apk/res/android"android:id="@+id/sv_container"android:layout_width="230dip"android:layout_height="38dip"android:background="@drawable/usage_list_dark" ><ImageViewandroid:id="@+id/iv_switch_cursor"android:layout_width="120dip"android:layout_height="36dip"android:layout_centerVertical="true"android:layout_marginLeft="0.5dip"android:layout_marginRight="0.5dip"android:background="@drawable/usage_list_green" /><LinearLayoutandroid:layout_width="fill_parent"android:layout_height="fill_parent"android:gravity="center" ><TextViewandroid:id="@+id/switch_text_true"android:layout_width="wrap_content"android:layout_height="wrap_content"android:layout_weight="1"android:gravity="center"android:text="开" /><TextViewandroid:id="@+id/switch_text_false"android:layout_width="wrap_content"android:layout_height="wrap_content"android:layout_weight="1"android:gravity="center"android:text="关" /></LinearLayout></RelativeLayout>
接着是这个View的代码,继承自LinearLayout :
package com.lxb.switchdemo;import android.content.Context;import android.graphics.Color;import android.os.Handler;import android.os.Message;import android.view.LayoutInflater;import android.view.MotionEvent;import android.view.View;import android.view.View.OnClickListener;import android.view.animation.Animation;import android.view.animation.Animation.AnimationListener;import android.view.animation.LinearInterpolator;import android.view.animation.TranslateAnimation;import android.widget.ImageView;import android.widget.LinearLayout;import android.widget.RelativeLayout;import android.widget.TextView;public class SwitchView extends LinearLayout implements OnClickListener {private static final int FLAG_MOVE_TRUE = 1; // 向左滑动标识private static final int FLAG_MOVE_FALSE = 2; // 向右滑动标识private static final int HANDLE_LAYOUT_CURSOR = 100; // 处理调用开关的layout方法private Context context; // 上下文对象private RelativeLayout sv_container; // SwitchView的外层Layoutprivate ImageView iv_switch_cursor; // 开关邮标的ImageViewprivate TextView switch_text_true; // true的文字信息控件private TextView switch_text_false; // false的文字信息控件private boolean isChecked = true; // 是否已开private boolean checkedChange = false; // isChecked是否有改变private OnCheckedChangeListener onCheckedChangeListener; // 用于监听isChecked是否有改变private int margin = 1; // 游标离边缘位置(这个值视图片而定, 主要是为了图片能显示正确)private int bg_left; // 背景左private int bg_right; // 背景右private int cursor_left; // 游标左部private int cursor_top; // 游标顶部private int cursor_right; // 游标右部private int cursor_bottom; // 游标底部private Animation animation; // 移动动画private int currentFlag = FLAG_MOVE_TRUE; // 当前移动方向flagpublic SwitchView(Context context) {super(context);this.context = context;initView();}@Overrideprotected void onLayout(boolean changed, int l, int t, int r, int b) {super.onLayout(changed, l, t, r, b);// 获取所需要的值bg_left = sv_container.getLeft();bg_right = sv_container.getRight();cursor_left = iv_switch_cursor.getLeft();cursor_top = iv_switch_cursor.getTop();cursor_right = iv_switch_cursor.getRight();cursor_bottom = iv_switch_cursor.getBottom();}private Handler mHandler = new Handler() {@Overridepublic void handleMessage(Message msg) {switch(msg.what) {case HANDLE_LAYOUT_CURSOR:iv_switch_cursor.layout(cursor_left, cursor_top, cursor_right, cursor_bottom);break;}}};public void onClick(View v) {// 控件点击时触发改变checked值if(v == this) {changeChecked(!isChecked);}}/** * 初始化控件 */private void initView() {LayoutInflater inflater = (LayoutInflater) context.getSystemService(Context.LAYOUT_INFLATER_SERVICE);View view = inflater.inflate(R.layout.switch_view, this);view.setOnClickListener(this);sv_container = (RelativeLayout) view.findViewById(R.id.sv_container);switch_text_true = (TextView) view.findViewById(R.id.switch_text_true);switch_text_false = (TextView) view.findViewById(R.id.switch_text_false);changeTextColor();iv_switch_cursor = (ImageView) view.findViewById(R.id.iv_switch_cursor);iv_switch_cursor.setClickable(false);iv_switch_cursor.setOnTouchListener(new OnTouchListener() {int lastX; // 最后的X坐标public boolean onTouch(View v, MotionEvent event) {switch(event.getAction()) {case MotionEvent.ACTION_DOWN:lastX = (int) event.getRawX();cursor_left = v.getLeft();cursor_top = v.getTop();cursor_right = v.getRight();cursor_bottom = v.getBottom();break;case MotionEvent.ACTION_MOVE:int dx = (int) event.getRawX() - lastX;cursor_left = v.getLeft() + dx;cursor_right = v.getRight() + dx;// 超出边界处理if(cursor_left <= bg_left + margin) {cursor_left = bg_left + margin;cursor_right = cursor_left + v.getWidth();}if(cursor_right >= bg_right - margin) {cursor_right = bg_right - margin;cursor_left = cursor_right - v.getWidth();}v.layout(cursor_left, cursor_top, cursor_right, cursor_bottom);lastX = (int) event.getRawX();break;case MotionEvent.ACTION_UP:calculateIscheck();break;}return true;}});}/** * 计算处于true或是false区域, 并做改变处理 */private void calculateIscheck() {float center = (float) ((bg_right - bg_left) / 2.0);float cursor_center = (float) ((cursor_right - cursor_left) / 2.0);if(cursor_left + cursor_center <= center) {changeChecked(true);} else {changeChecked(false);}}/** * 改变checked, 根据checked移动游标 * @param isChecked */private void changeChecked(boolean isChecked) {if(this.isChecked != isChecked) {checkedChange = true;} else {checkedChange = false;}if(isChecked) {currentFlag = FLAG_MOVE_TRUE;} else {currentFlag = FLAG_MOVE_FALSE;}cursorMove();}/** * 游标移动 */private void cursorMove() {// 这里说明一点, 动画本可设置animation.setFillAfter(true)// 令动画进行完后停在最后位置. 但这里使用这样方式的话.// 再次拖动图片会出现异常(具体原因我没找到)// 所以最后只能使用onAnimationEnd回调方式再layout游标animation = null;final int toX;if(currentFlag == FLAG_MOVE_TRUE) {toX = cursor_left - bg_left - margin;animation = new TranslateAnimation(0, -toX, 0, 0);} else {toX = bg_right - margin - cursor_right;animation = new TranslateAnimation(0, toX, 0, 0);}animation.setDuration(100);animation.setInterpolator(new LinearInterpolator());animation.setAnimationListener(new AnimationListener() {public void onAnimationStart(Animation animation) {}public void onAnimationRepeat(Animation animation) {}public void onAnimationEnd(Animation animation) {// 计算动画完成后游标应在的位置if(currentFlag == FLAG_MOVE_TRUE) {cursor_left -= toX;cursor_right = cursor_left + iv_switch_cursor.getWidth();} else {cursor_right = bg_right - margin;cursor_left = cursor_right - iv_switch_cursor.getWidth();}// 这里不能马上layout游标正确位置, 否则会有一点点闪屏// 为了美观, 这里迟了一点点调用layout方法, 便不会闪屏mHandler.sendEmptyMessageDelayed(HANDLE_LAYOUT_CURSOR, 5);// 这里是根据是不是改变了isChecked值进行一些操作if(checkedChange) {isChecked = !isChecked;if(onCheckedChangeListener != null) {onCheckedChangeListener.onCheckedChanged(isChecked);}changeTextColor();}}});iv_switch_cursor.startAnimation(animation);}/** * 改变字体显示颜色 */private void changeTextColor() {if(isChecked) {switch_text_true.setTextColor(Color.WHITE);switch_text_false.setTextColor(Color.GRAY);} else {switch_text_true.setTextColor(Color.GRAY);switch_text_false.setTextColor(Color.WHITE);}}/** * layout游标 */private void layoutCursor() {if(isChecked) {cursor_left = bg_left + margin;cursor_right = bg_left + margin + iv_switch_cursor.getWidth();} else {cursor_left = bg_right - margin - iv_switch_cursor.getWidth();cursor_right = bg_right - margin;}iv_switch_cursor.layout(cursor_left, cursor_top, cursor_right, cursor_bottom);}/** * isChecked值改变监听器 */public interface OnCheckedChangeListener {void onCheckedChanged(boolean isChecked);}public boolean isChecked() {return isChecked;}public void setChecked(boolean isChecked) {if(this.isChecked != isChecked) {this.isChecked = isChecked;if(onCheckedChangeListener != null) {onCheckedChangeListener.onCheckedChanged(isChecked);}layoutCursor();}}public void setOnCheckedChangeListener(OnCheckedChangeListener onCheckedChangeListener) {this.onCheckedChangeListener = onCheckedChangeListener;}}最后是Activity使用这个View:
package com.lxb.switchdemo;import android.app.Activity;import android.os.Bundle;import android.view.View;import android.view.View.OnClickListener;import android.widget.Button;import android.widget.LinearLayout;import android.widget.TextView;import android.widget.Toast;import com.lxb.switchdemo.SwitchView.OnCheckedChangeListener;public class Switch_demoActivity extends Activity implements OnClickListener {private LinearLayout layout;private TextView tv_showcheck;private SwitchView sv;private Button btn_set_true;private Button btn_set_false;private Button btn_getstate;@Overridepublic void onCreate(Bundle savedInstanceState) {super.onCreate(savedInstanceState);setContentView(R.layout.main);layout = (LinearLayout) findViewById(R.id.layout);tv_showcheck = (TextView) findViewById(R.id.tv_showcheck);sv = new SwitchView(this);tv_showcheck.setText("当前状态: " + getState(sv.isChecked()));sv.setOnCheckedChangeListener(new OnCheckedChangeListener() {public void onCheckedChanged(boolean isChecked) {tv_showcheck.setText("当前状态: " + getState(isChecked));}});layout.addView(sv);btn_set_true = (Button) findViewById(R.id.btn_set_true);btn_set_false = (Button) findViewById(R.id.btn_set_false);btn_getstate = (Button) findViewById(R.id.btn_getstate);btn_set_true.setOnClickListener(this);btn_set_false.setOnClickListener(this);btn_getstate.setOnClickListener(this);}public void onClick(View v) {switch(v.getId()) {case R.id.btn_set_true:sv.setChecked(true);break;case R.id.btn_set_false:sv.setChecked(false);break;case R.id.btn_getstate:Toast.makeText(Switch_demoActivity.this,sv.isChecked() + "", Toast.LENGTH_SHORT).show();break;}}private String getState(boolean state) {if(state) {return "开";}return "关";}}实现起来还是很简单的,主要还是坐标什么的需要计算与调整。
当然可能还会有一些BUG存在,有需要的可以下下来自行修改,也可以和我讨论。
更多关于Android相关内容感兴趣的读者可查看本站专题:《Android通信方式总结》、《Android调试技巧与常见问题解决方法汇总》、《Android开发入门与进阶教程》、《Android多媒体操作技巧汇总(音频,视频,录音等)》、《Android基本组件用法总结》、《Android视图View技巧总结》、《Android布局layout技巧总结》及《Android控件用法总结》
希望本文所述对大家Android程序设计有所帮助。